Monday, April 27, 2009

Photoshop Tutorial: Using the Levels and Selective Color Tools

This tutorial will demonstrate how to use the Levels and Selective Color tools to add contrast and color to an image. 
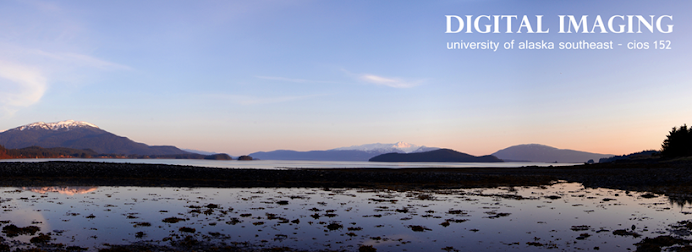
Before Adjustments
My goal was to increase the warmth in the above image to enhance the colors of the sunset that were already there. I also added contrast to the image to make the composition more dramatic. I accomplished this with a combination of the Levels and Selective Color tools. Below are written instructions for the settings that I used.
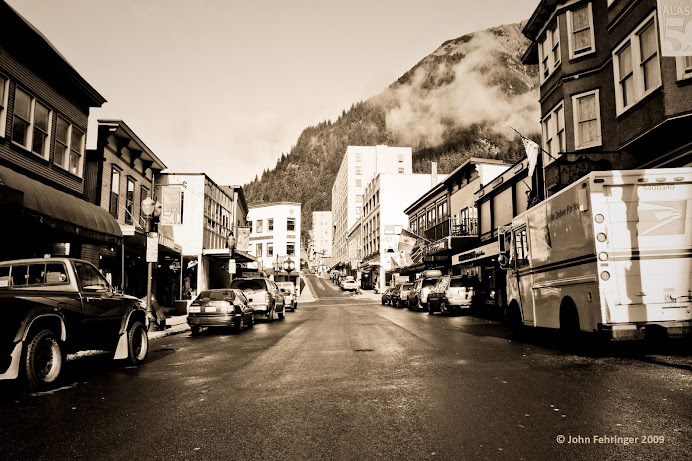
After Adjustments

This information is intended as a supplement to the video tutorial that you can watch here. I recommend that you watch the video first.

Here are the steps I took to achieve this result:

Image --> Adjustments --> Levels  (or Ctrl + L)

The Levels tool lets you adjust the shadows (blacks)  midtones (grays) and higlights (whites) of an image along its histogram. You can adjust the red, green, and blue all at once on the RGB channel (good for adjusting contrast and brightness) or each of these colors independently on their repective channel. 

Adjusting the midtones on individual color channels can add color to an image in a way similar to adjusting tint.  Here are the Levels settings that I used to enhance the contrast and colors of the sunset:

RGB Channel: Shadows - 15, Midtones - 74 (Increased contrast)

Green Channel: Midtones - 91 (Added Red)

Blue Channel: Midtones - 82 (Added yellow/orange)

Red Channel: Midtones - 1.02, Highlights 249 (Added red/pink to highlights in clouds)

Image--> Adjustments --> Selective Color 

The Selective Color tool lets you make adjustments to individual colors in your image by changing their levels of cyan, magenta, yellow, and black. Below are the settings I used to adjust the blues in the sky for my image.

Colors: Blues - Magenta +17, Yellow +19, Black + 50

Additional Notes

Although Levels can be used on any image, it should be done with care. Adjusting Levels on the RGB channel can be a good way to add contrast and highlights to an image. I encourage you to experiment with this tool to get a feel for its abilities. Always make a duplicate later or duplicate image of the file you are working with to prevent uninteded permanent changes. 

Adjusting levels on single color channels should only be used to correct a color cast or if you intentionally want to add colors to an image.

Learning keyboard shortcuts is an important part of learning to use Photoshop and will greatly increase your efficiency. Below I have included the ones used in this tutorial.

Keyboard shortcuts for commands used:

Levels ----------------------------> Ctrl + L
Hide Tool Bar and palettes --------> Tab
Switch between open files ---------> Ctrl + Tab
Fit image to screen ----------------> Ctrl + 0 (zero)

If you have any questions or comments please feel free to email me at joeltmundy@yahoo.com

Sunday, April 19, 2009

Project 7: Layer Masks

This project was a little more technical than the past few and I ended up learning a lot.

Original Photo

I used the same photo for all three compositions in this project to emphasize the differences between the techniques used in each. This photo is of Presley, one of our family dogs, and was shot by my brother James in Anchorage.

Composition 1: Adjustment Layers and Layer Masks


My goal for the first project was to give depth to this picture. I did this by increasing the detail of the foreground image, while decreasing the detail of the background. To accomplish these adjustments to different areas of the picture I used a layer mask. 

First I created a new adjustment layer and adjusted curves.  Next I added a layer mask to the curves layer. I then created a new layer above the curves layer, filled it with white, and turned the opacity down to about 75% to reveal the foreground image underneath it.  Going back to the layer mask, I painted around the foreground image in black to create a mask that would block out the curves adjustment for the background while fully showing the foreground image.

Occasionally I got mixed up about which layer I was supposed to be painting on, as you can see in the video, but in the end I figured it out without too much trouble. So then I had a layer mask that effectively isolated the background from the foreground, allowing me to make changes to each independently. I applied a watercolor filter to the background layer and made adjustments with shadows and highlights to increase the detail of the foreground image. Last I changed the opacity back to 100% on the topmost layer and experimented with different gradient map effects; finally settling on a bronze color that I felt best accented the colors in the foreground image. I was torn between the bronze and a higher contrast black background, but in the end I went with the bronze. I recorded the whole process and set playback to 300% speed. You can watch it here, feedback welcome. 

Composition 2: Using a Layer Mask as a Stencil

For the second composition I used a layer mask to create a stencil effect. I created a tonal map by using selections of shadows and midtones from Select - Color Range. I then used the Fill command to fill the midtone selections with 50% gray and the shadows with 100% black. I merged these two layers to create the tonal map. Next I created a new layer that I filled with a white background, making sure to turn off preserve transparency. I then added a layer mask to that layer and copied the tonal map onto the  layer mask (selecting it by holding down the alt key) and inverted the image. Next, I moved from the layer mask to the layer thumbnail and painted with the brush to reveal the stenciled image. I recorded this process and you can watch it here. 

Composition 3: Creating a Textured Type Effect with a Layer Mask

For the textured type composition I created a tonal map and a new layer and layer mask through the same process as in composition 2. Then I copied text from a word document onto the new layer, creating a text layer. Next I copied the tonal map onto the layer mask and inverted the image. Combining the text and tonal map mask created a nice textured effect. I thought the effect would be improved by adding emphasis to the foreground image so I copied it (with only a little trouble as you can see in the video) into a version of composition one to use the background mask I had created there. I then applied a black and white gradient map to the background to unify and add emphasis to the black and white foreground image. 

By this point I felt fairly comfortable with the layer mask process as well as the associated keyboard/mouse shortcuts. The creation of the third composition went significantly smoother that the first and is my favorite of the three. That’s always a good indicator of progress for me.  I recorded the process and you can watch it here, feedback welcome.

I feel like I am just getting started with layer masks and have made some good initial progress. This assignment really helped me to get the basics down. Developing it will take some practice like everything else in PS. If you have time to check out the videos I posted to YouTube I think they are an effective way to share our experiences. The one John posted definitely helped me to better understand these concepts. 

Monday, April 6, 2009

Project 6: Photo Stitching


I ended up really enjoying this project, so I did several different panoramas of the same subject. They were shot on several different days, with varying exposures and weather conditions. I’ll start with my main submission.

I considered different subjects for the photo stitch project. In the end, my love of landscape and nature shots, combined with our first sunny days in long while made the decision for me. I shot these behind the university with a tripod, standing in snow up to my knees. The final product is 5 different photos stitched together. I mention the snow up to my knees to emphasize the trouble I had getting the tripod level. I ended up with a ‘curving’ effect as I rotated the camera. I used the Transform-Rotate tool to straighten the crooked ones out and line up the different pictures. Next I used the eraser with the opacity at about 60% to blend the photos together. The colors/exposures matched pretty well so I didn’t even need to adjust Levels. I did adjust Brightness/Contrast, turning them both up a little. Other than that I left it as is. For the text I wanted something that similar to the graphics standards of UAS, the idea being that they could use it on this photo on their website or in university publications. The font is Alte Haas Grotesk which I got off of dafont.com. I felt that a white color for the font was the best choice, and the only color that would match the feeling of the picture. I decided to put it up top so it would contrast well against the blue of the sky. I used the grid to center and position it.  

Original Stitch

With Text Added

This next one is actually 7 photos stitched together. It’s more dramatic, really giving the panoramic feel. And while you can’t fully see the mountains, I really like the effect the clouds bring to the composition. The adjustments in this one are basically the same as the first. I turned up the contrast a little, and also turned up the magenta in the blue channel to make the sky pop more, giving better contrast to the clouds.

This series I took on a frosty morning before work. It’s 5 photos stitched together. Same techniques and adjustments as the previous one, the only difference being I did adjust levels. While it doesn’t have the brilliant blue sky of, I really like the early morning feel, and the shape of the clouds lit up by the sun. With pictures I’m always trying to capture the feel that I had when I was taking them. I believe I accomplished that with this one. Every morning as I walk to work I always find myself wishing I could share the beauty of this view with others. I’m really excited about this photo stitching technique because it helps to do that, to capture the essence of what I am seeing. I was reading about panorama shots on some website and it was saying that these types of photographs are so effective because they almost match the eye’s natural field of vision. You really get the feeling of being there. I did have some trouble on the left side with the sun in my lense. The little rainbow effect in the rightmost frame I like, but you can also see a lighter vertical stripe to the left of that. I wasn't able to correct it without losing what I felt was too much of the remaing detail. If anyone has suggestions that would be appreaciated. Or maybe it waorks that way I'm not sure.


So I did one more cause I was on a roll and getting the technique down pretty well. This one was more of a challenge because of the tripod-in-snow issue I mention earlier. The pictures on the right side especially (I think this one was 6 total) were really crooked, and required a lot of adjusting/lining up to fix.  I made the canvas extra tall and stitched them together that way (it ended up at a diagonal.) Then, when I had that done I flattened the image and Transform-Rotated the whole thing before cropping.  I had tried straightening each one individually as I had done on the previous ones but they were just too crooked, it was giving me problems. I think this way is faster and more accurate.


With text

All of these images I created at 300 dpi with the hope of getting poster prints of them done. For the uploaded files reduced them to 72 dpi and then reduced that image by 20%. This was a great project and I plan to do many more panorama compositions.

Thursday, March 26, 2009

Filters: Color and Contrast

For these I took a simple photo that had some color and shadow. The overall goal was to enhance the color and contrast of the picture, specifically, in the shadows reflected on the wall. I also wanted to enhance the plastic, cartoony feel of the bottles.

With this goal in mind I tried about 10 different filters with variations of each one. I picked the best 3 from those. While I did keep my original goal in mind for each, I also did what I always have done when using filters on my photos, which is basically pick what looks good. I don't know how to define it much more than that. The 3 filters I ended up using for my orginal goal/them are Dark Strokes, Sumi-e and Accented Edges. The Glowing Edges one I threw in as an abstract departure. Its been done I know, but I've always liked it, and I like how it emphasizes the bottles and their colors. I recommend clicking to enlarge each one to get the best feel for its effect.

Original Photo

 Accented Edges Filter

-enhances the texture of the wall, shape and plastic feel of the bottles. enchances color, shadows and spots of light on the wall-


Dark Strokes Filter 
-high contrast with this one, it really darkens the shadows and turns up the color on the wall-


Sumi-e Filter 
-another high contrast, similar to the Dark Strokes but less is lost in the shadows, more clarity-

Glowing Edges Filter  
-gives an abstract feel and highlights the colors and outlines of the bottles, bringing them into the foreground-


Wednesday, March 25, 2009

Filters: Smart Sharpen and Ink Outlines

I took this photo at school a couple weeks ago. Before I knew PS, I would have chucked it into the burn pile. For the filters project, I decided to bring it back from the dead, and use some filters in process. My goal was to make this picture look like what I saw when I was taking it. In other words, how I imagined the picture would look when I took it. Here's a general outline of what I did.  

Camera Raw
Raised temperature a little
Adjusted exposure 
Adjusted brightness and contrast

Photoshop
Levels - Raised low and mid levels
Applied Smart Sharpen Filter - Remove: Lens Blur Amt. 200% Radius: 2 pixels
Faded Smart Sharpen Filter: Luminosity
Adjustments: Selective Color - adjusted reds, greens. 
Adjustments: Selective Color - neutrals - raised yellow (with only totem pole selected)
Hue/Saturation Adjustments

Applied Ink Outlines Filter
Hue/Saturation Adjustments

I was able to sort the colors out fairly easily; I feel like I'm getting better at that. The main trouble I had in this photo was contrast. The original is washed out and flat.  I turned up contrast in adjustments but it wasn’t enough. The other problem I had was all the white snow. I needed a way to get contrast and definition around the edges of the snow, and to make the totem pole stand out from the background. The Smart Sharpen filter helped with this but it wasn’t enough. I wanted the final image to be a bit stylized and to crank up the contrast at the same time. To accomplish this I ended up using the Ink Outlines filter. It added the contrast I needed and lightly outlined the snow areas, plus gave the totem the look I was going for. This end result (rightmost picture) is very close to how I imagined the shot when I took it.    

One problem I ran into was losing some details of the Ink Outlines Filter when I reduced the image for the web. (I changed it from 300 dpi to 72.) I ended up going back and reducing the image without changing dpi. Hopefully the conversion that takes place during upload will be more kind. Be sure to click on the image to enlarge it and get the full view. Added note: alas the details didn't quite come through after the upload. I still think the results/improvements are visible enough. On a widescreen you can view all 3 at once. Non=widscreeners will have to scroll, apologies.

From left: 
 1. Original Photo  2. Smart Sharpen Filter  3. Smart Sharpen + Ink Outlines Filter


Here's a before and after to compare the original and final side by side:

Saturday, February 28, 2009

Project 4: Zac Tile

Getting Started

After opening the Zac Tile file, I doubled the size of my canvas and selected around the outline with the rectangular marquee tool. I then cloned and moved the selection with Ctrl + Alt + Shift and flipped it horizontal with the Free Transform command.  Then I selected the black outlines by loading the channel as a selection (wish I had known that for the last project) and made them a new layer. At this point I made about 10 duplicate images and started experimenting.

Compositions

The first thing I tried with the brush tool was Color Dynamics because it was my favorite from the book assignment.  I tried a variety of diameter, hardness, shape dynamic, and color dynamic settings. I ended up using a brush diameter of 46 pixels with Hue jitter- 92% and  Saturation jitter – 46%. I got the best multicolored effect with red selected for brush color.

For the composition with the white background I moved the brush quickly across the lines to get a thin striped effect.


For the composition with the black background I moved the brush more slowly and single clicked each circle in the frame to get one color per circle.  For the background I left the color dynamic settings active and switched to black.  I then changed to the background layer and filled it in.  This increased the contrast of the colored lines and added texture to the background.


For the fully colored composition, I added the color fill layer and used the custom colors loaded from the file that came with the book. I used the paintbucket tool set to ‘all layers’ with tolerance set to 100, to assure coverage in the corners and other small areas.  In the end I only had to zoom in and fill a few pixels it had missed. I used as many colors as possible (sticking to my multicolored theme) but left the inside of the frame white to contrast the colored circles within it. At the end this picture felt a little flat and I wanted to add some depth.  I experimented with different filters until I found the ‘plastic wrap’ one. It gave me the effect I was looking for, almost like plastic blocks were put together to make the lions face.


Layer Trouble

At some point I messed up the layers so that any green color I selected showed as dark green. I never did figure out why, but it went away once I flattened the image which is why I assume it was related to layers. That wasn’t the only layer related problem I had.  I wanted to make a layer to separate the frame from the face.  I selected the frame, copied it, and went to Layer -- > New -- > Layer via copy.  It created the layer but when I went to paint on it, the paint showed up in the thumbnail but not on my image.  Maybe I should have created a New fill layer? Or maybe it was the layer hierarchy I had wrong.  Not sure.


Friday, February 13, 2009

Project 3: Making Selections

Project 3: Selection Mania

I used the rectangular marquee tool to make four large rectangles while holding the shift key. Then I removed parts of them with the single row marquee tool while holding the alt key to form the squares and to make the shapes more even. I made the triangles with the polygonal lasso tool. This took me a few tries but I got it eventually.

For the circle in the center the biggest help was the ‘spacebar’ trick he taught us in the book, which lets you pause and move the selection. I was having a hard time centering it before I learned that.

Project 3: Dance1

This was a good introduction to doing selections and many other Photoshop tools.

To make my selections for this project I ended up zooming in and using the magnetic lasso tool. Of all the selection tools I tried from the book, this was the one I could get the most accuracy with. I tried the quick selection tool first, but it always ended up leaving out small sections of the face. I tried adjusting the brush diameter and hardness to correct this like we learned with the giraffe from the textbook but didn’t have much luck.

To resize the head I went to Edit – Free Transform. One of the cool things I discovered here was, since these were profile shots, I could change which way the head was facing to match the target picture. The photo I used for the selection was actually taken with me facing the opposite direction

Then Image --> Adjustments --> Black & White. I then used Brightness/Contrast to match my head more closely to the source photo. Mostly I upped the brightness.

Our heads were shaped differently so there were parts of the old head sticking out. I used the clone stamp tool to get rid of those. At first I couldn’t figure out how to use the clone stamp tool so I opened the picture in Camera Raw and used the heal tool which worked OK. But once I figured it out the clone stamp tool worked the best.

To get my neck to appear as if it was inside the collar and bowtie I created another layer from a selection of the bowtie.

One problem I had was a slight halo of white around my head which appeared when I changed the Brightness and contrast settings. I tried to adjust the Blending option to correct this but got a little lost. Everything seemed too drastic a change. This is something I need to work on more but overall I’m happy with the results.

Project 3: Dance2

For this one I used the same techniques detailed in dance1 with one big difference. The white shutters behind the dancers were problematic. The clone stamp solution from the previous picture wasn’t going to work for this one. So I zoomed in around the head and used the rectangular marquee tool to make selections of the shutters which I copy/pasted over the head. When I got too many layers I flattened the image and repeated the process. This took some practice and at first I got confused with the different layers but I figured it out eventually.

I then used the magnetic lasso to select the head in different photo of myself. I used refine edge and adjusted the contrast to 20 and Feather to 1.0. Refine edge is a step I missed on the Dance1 photo. I realize now it could have removed the small white halo. At that point though I had already flattened the dance1 image and was happy with how it looked, but it’s something to remember for next time. I also used Edit --> Transform --> Rotate to angle my head so that I was better facing the other dancer. I selected and created a separate layer for the collar/necktie and positioned it. Brightness/contrast to match the source picture, flattened it and I was done. I think it came out better than the first one but I’m happy with both of them.

Conclusion

The selection mania was a good way to start to get familiar with the selection tools. Both of the dancer projects got me a lot more familiar with Photoshop. I was experimenting and looking through all the lists to find tools that would work.

I also learned that there is a hierarchy to the layers palette that determines which layers appear in front of, or on top of each other. This seems fairly obvious now that I know it but took me some time to figure out.

The 'Drawing Precise Curves' section of the book lost me about halfway through. I've been over it twice now and can't get it to do what it's suppose to. I get the path drawn around the pelican's beak (after about 4 trys), but when when it gets to the copying paths between layers part, I can't get that to work.